Wednesday, May 4, 2011

Teacher Appreciaton!!


Teacher appreciation week has taken on a whole new meaning for us since we’re actually teachers now!

Both of us just wrapped up our teaching internship. During that time we work under the supervision of a rock star teacher. Obviously we both learned A LOT from our respective teachers and wanted to thank them for allowing us to spend the past four months in their classrooms.

Here are a few of the things we created for our teachers:

Clipboards – the clipboards were a dollar a piece at Dollar Tree, we already had some of the scrapbook paper on hand,  and we definitely already had the mod podge. This was an extremely simple project!


1.    Cut the scrapbook paper to size by tracing the clipboard onto the paper.
2.    Use a paintbrush to spread a thin ribbon of mod podge around the edge of the clip board.
3.    Working quickly, place the scrapbook paper onto the clipboard.
4.    Spread mod podge all over the surface of the paper. 
5.    Repeat for the other side.

Button Apple on Burlap – this was an “already on deck” kind of project. Had the buttons, had the burlap, and had the turquoise frame. 


1.    Cut the burlap to size.
2.    Free hand an apple (using chalk) onto the burlap.
3.    Hot glue the buttons over the chalk outline.
4.    Fill out the apple with more buttons or leave it empty.

I found the inspiration for the apple on Etsy without even planning on it. I was just shopping around for art…

Additionally, teachers can always use essential supplies like:
         Kleenex
         Pencils
         Pens
         Paper clips
         Brightly colored printer paper
         Paper towels
         Cleaning supplies
         Fun expo markers

If you want to get more sentimental than that, a thank you card will do!

Have fun!

Wednesday, April 20, 2011

Ana White Bench


Chelsea recently introduced me to the world of Ana White. Cue the lights and soundtrack now. It was one of those “ahhhh haaaaaaa” moments like from the movies.

I spent quite a bit of time drooling over so many of her amazing designs! I pretty much wish I had the know-how, time, and tools to build absolutely everything she has available.

While I was home for spring break I convinced Ted to help me build one of Ana’s designs. I loved the look of the rustic x bench! My persuasive abilities must be decent since he agreed and we fled to the nearest home improvement store to purchase supplies.

A few days after purchasing the lumber and the screws for the project, we finally got to work! I got to use a table saw (ohhh yeaaaa!). I still have all of my fingers too! Ted will tell you, I was very careful around it.

Although the instructions came with pictures, I sure had no clue how to cut at an angle and what point to point meant. I would have relied on Google to help us figure it out, but Ted knew what he was doing.

After making all the cuts, I started sanding all of the edges. I wanted the edges to be smooth and cornered anywhere someone may touch or accidentally run into the bench.

The assembly was probably the toughest part of the process since it involved countersinking screws and centering all of the different parts of the bench. Counterskinking the screws was a great idea on Ana’s behalf since that means they wont show and add to the polished look of the bench.

I let the wood filler dry overnight and sanded off the excess. My original plan was to paint the entire bench a light green color that I got at Lowe’s (I think) for $5 – instead of $30! Then I got to thinking though…

I’ve really been digging furniture that is painted a light color on the bottom and stained a darker color on the top. I had stain… soooo it was quite simple to change the plan.

After just one super light coat of walnut stain.

I’ve been looking at this bench with love eyes since yesterday! I couldn’t be happier with how it turned out. If you have the tools and know-how to build something, I highly recommend it. It feels GOOD to tell someone “hey, I built that.”
 
Don’t forget to check out Ana White for some inspiration! She seriously has fantastic plans for just about anything – and no we aren’t being paid to say that.

Happy building!

Wednesday, April 13, 2011

Dresser Win!


Finding the perfect dresser for the perfect amount of money is hard. I’ve been in love with the IKEA Hemnes dresser forever.

Source


Symmetry is my cup of tea and this dresser has it!

As a college student, the price is much less delightful. I cannot justify spending $300 on a brand new dresser even IF it will last me forever as most IKEA pieces do.

Thus, when it came to furniture shopping I scoured Craigslist for a dresser deal. I did find a deal – a five piece white bedroom set including a nightstand, bookshelf (which I love oh so much!), headboard, mirror, and dresser for $325. Considering that I got five pieces of furniture for what I would have spent on ONE piece at IKEA, I was pretty thrilled.

After two years, I’ve had it with the stupid dresser. It seems to be falling apart on one side, while on another side a leg truly has broken off, and it is highly impractical. It looks more like a buffet than a dresser and if I fix the leg one day that is exactly what I will use it for. After all, I have an abundance of table linens because of the Dillard’s clearance center and Goodwill so close to my house. 


On a recent trip to South-ish Florida, I purchased this beauty! Yes, that is a French style dresser in an antique white/yellow and gold finish! I’m more excited about the dresser than the finish though.


It has got to go! At $25 (yes TWENTY-FIVE) I could not let it go. This dresser is solid! The top is condensed white particleboard so it is un-paintable, part of the sides are particleboard, and the rest is wood.


I’ve decided that I would most appreciate this dresser in a bright white finish. I don’t want to paint it a punchy color like corral or apple green or a bright light blue since I’m not exactly sure if I’ll still like that in a few years. White is classic and safe.

SNEAK PEEK!!


Stay tuned for a follow up post to see what it looks like!!
 

Wednesday, April 6, 2011

Change for the Cheap!

Well, I’ve been a bit busy as of late. So has Chelsea. For good reason, we’re in the final stretch of college – literally! Graduation is less than a month away! We’ve been interning at different schools everyday, all day and loving every second of it! Yet, after a long day of teaching, a crafty project (yet a simple one) is always relaxing.  These are simple, less than 10-minute projects with a personal touch.

Project #1: Change Jar

Loose change. I find it in the bottom of my purse. I find it in my laundry hamper. I find it in the trunk of my car. I find it on the floor in my room. Don’t get me wrong. I like love loose change! Especially when I run out of places to store it and finally muster up the courage to roll it up and take it to the bank.

I’m still working on the collection (the more loose change, the better the happy dance after counting!), but seeing loose change all over my dresser was DRIVINGMECRAZY since it was not fitting into the little wooden box I usually keep it in anymore.

So… here’s what I did. I found a Smucker’s jelly jar in our collection of random things. I found some scrapbook paper that coordinated with the colors of my room and cut off a thick strip of it.  I then taped (yes, that easy) the paper around the jar and then used dollar store vinyl letters to spell out “change” on the jar. The last step was using spray paint to cover up the red and white checker pattern. ORB was the obvious choice. I had it already and it matches my room. There aren’t many/any how-to photos since I figured it was rather simple.

Project #2: Monogram “Art”

I’m not the biggest fan of monograms (I wouldn’t have a bunch of different “A’s” all over a wall or monogram every towel and pillow case and blanket and sock I own) but I’ve recently started to like them more.

My teacher bag that I’m obsessed with (L.L. Bean) is monogrammed. I have a cool monogram painting on my room door that Val made for me and now I have this super cool picture frame!

The picture frame itself is old. I got it at Jo-Ann’s light years ago. Well, I’m not that old… but it was definitely in my high school era. Whenever I got it, I painted it white and used turquoise paint for the edges to make it cute I guess. Well, it wasn’t really my style anymore soooo I used lots of primer (that turquoise was a pain to cover) and then two or three coats of white spray paint to cover it up.

Anywhoooo, I used another coordinating sheet of scrapbook paper and cut it to size (4x6).  Once upon a time (December, I believe?) my mom spotted these awesome black and white damask pattern sticker letters. The black is actually velvet!


After snipping and mathematically determining eyeballing the center of the piece of paper, I slapped that “A” on there and stuck it in the frame. I added it to my collection of frames on my dresser. I love photos and art so looking at my dresser makes my heart happy each day!


Happy thoughts,


Show and Tell @ Blue Cricket Design


Thursday, March 10, 2011

Feeling Rebellious!

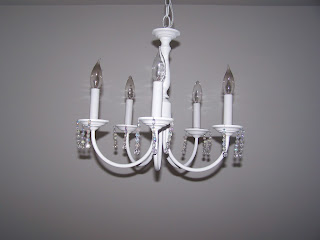
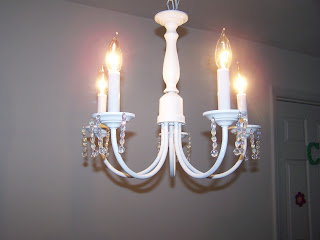
Since most of you are strangers and don’t know where we live… we have a confession. We destroyed beautified property that belongs to our apartment complex.Essentially, we took our standard apartment chandelier from brassy (ehhhh) to classy (ooooh la la!). Really we are doing our complex a major favor.

Thanks Google! We have no "before" picture.

Considering that brass was “the thing” before we were born (oh yeah – we’re late 80’s babies!) we weren’t all that thrilled with the brass nightmare dangling from the ceiling. 


A bottle of cheap-o primer and cheap-o spray paint and we were in business! We decided that white was our best option in case we ever needed to DENY that this was our doing. 

We have a good case too, since anything that was NOT supposed to be painted white (such as the brass door knobs and brass door locks) actually was sloppily spray painted over.


To improve upon this drastic, yet oh so welcome, color change we added “chandelier crystals.” No they aren’t Swarovski – easy mistake for the untrained eye ;)

Our “chandelier crystals” are actually beads from Micheal’s purchased on a day where all beads where on sale AND with lots of 40% off coupons. 


We are estimating that the final cost of this project is somewhere around $20. It took less than 3 hours total with drying time and re-installation. 

Thus if you are in a rebellious mood or just sick of looking at your brassy chandelier - go forth and do something about it! A quick trip to the store for supplies and we assure that you will be in business. Just don't electrocute yourselves - safety first!

Keep it classy not brassy,


Monday, February 28, 2011

Up on the Mantle!

We like to think that we live in a swanky, luxurious, grown-up apartment. We sort of do (thanks to our budget friendly DIY and decorating savvy), but some of the true built in futures (like a fireplace with a mantle) are missing from our college student apartment.

Never fear though – free shelves are always near! Okay, maybe not always, and maybe not for everyone. This is the second floating shelf that Allison got from a friend who was moving out of her apartment. The other one displays Chelsea’s “Antiques” sign in her room.

Chelsea's Room
Anyway, this spare floating shelf has become our makeshift mantle. You really can’t beat free either! We’ve been able to decorate for the seasons and holidays on our new mantle.
Christmas Mantle :)
Fall Mantle :)


Our current mantle “wardrobe” consists of a milk glass candlestick (a la Goodwill $2.99), mini pewter vases (scored at a sidewalk sale for a buck a piece in GA), green beer bottles (this is college), and a fancy LIVE sign from TarJay (CLEARANCE $3.74 instead of $15!), and finally the flowers are from Dollar Tree.

We’ve missed you all and promise that you’ll be hearing from us more in the near future! We’re about to be college graduates!!!!!

Mantleous Love


Sunday, January 30, 2011

Let There Be Cake!

You probably don’t want to read another one of our lame apologies for not blogging enough… so we’ll just get going like we’ve been here EVERYDAY!

SURPRISEEEE!
Anti-social :/

Before we jump in, you may need some background information. Chelsea, yes Decor Roomie Chelsea, had her 22nd birthday a month ago. All of us, as in other roomies and friends were not able to celebrate with her since we were had winter break. Thus, Rachel (a roomies) planned a surprise birthday party for her. I (Allison) am currently being anti-social and typing this post because I am just too darn excited about all of this.

Rachel invited all of our friends and Val made Penne a la Vodka and I made a cake (you may have already figured that out).


Isn’t it beautiful? Okay so maybe my frosting skills were off, but I was in a rush!

Want the recipe? Of course you do :)

1 Box of Yellow Cake Mix
2 Cans of DRAINED Mandarin Oranges (the average size can… threw it away already otherwise I would tell you how many ounces)
Whipped Cream (see recipe below)

Prepare the yellow cake mix according to directions on the box for 9” round cake pans.

Allow the cake to cool and start preparing the whipped cream.

The recipe for that is as follows:
3 cups of whipping cream
1 ½ teaspoons of vanilla extract
6 tablespoons of granulated sugar
Orange Zest

Combine all of the ingredients and use an electric mixer on medium speed until peaks form. You may also use a whisk, but your arm or elbow will begin to hurt after a while as mine did.

Once the cake has cooled and the whipped cream has been chilled in the fridge, begin the assembly process.

Place one cake layer on a plate and spread a generous helping of whipped cream on the cake. Then take use about one cans worth of mandarin oranges and spread them out over the whipped cream.

Top this with the next cake layer and then frost the entire thing with the whipped cream. Beautify the cake by topping it with more mandarin oranges.

Chill the cake before serving. I made this recipe up and I am rather proud of it. Everyone thought it was delicious and I am happy, yet sad, to say that there are only two slim slices of it left.


Chelsea’s surprise party was a success! Time to socialize :)


Saturday, January 1, 2011

The Good Kind of Hurricane

Thanks to all of the blogs we love reading, Allison and I have been inspired to try lots of simple projects that we can make our own. We love to try things that require the least amount of brain power, and more importantly, cash. Due to our college student status, extra amounts of either of these items come at a premium. Some of the projects we’ve come to love the most are those using items from none other than our local Dollar Tree. DT has become the place to get our DIY-ing fill when time and money run short. Of course, it is important to keep in mind that you must have an imagination and no fear of using a little elbow grease.

A specific project we came across on various other blogs that was so easy, and cost less than $5 total, was making decorative hurricanes using Dollar Tree items. It was easily customizable for both of the bedrooms we wanted to place them in, just by choosing different fillers for each.

To start off, I picked up my DT items: one pillar candle holder with a flared rim, and one glass candle stick holder.

Then, using some Gorilla Glue we already had on hand, attach the end of the candle stick with the opening to the center of the bottom of the pillar candle holder. …We made no measurements to find the center, a simple eyeball did the trick for us. Be careful not to go overboard with the Gorilla Glue since it does puff up.
Here’s the hard part. Once you’ve applied the glue and have your hurricane sitting upside down, DO NOT touch it for an hour! Place a cookbook (or textbook!) balanced on the candle stick holder to add some pressure. Otherwise, set this out of the way and WALK AWAY!

When the Gorilla Glue is good and dry, you can flip it over, and admire your handy work. But not for too long, because that beauty now needs something inside it! For our hurricanes we chose two different fillers, because these were going to be placed on two different desks, in two different bedrooms.

For Chelsea’s hurricane, she used some sand brought back from a local beach, some glass bead fillers she found packed away in the holiday decorations and a white pillar candle from DT. Allison’s hurricane contains a green DT candle and some black DT river rocks. Each one looks beautiful in their respective bedrooms, and cost just under $5 for both the hurricane and the filler. And the best part? It is so easy to change the contents to fit any room, any season, any mood!

Not the best shot, but you can see where it lives there next to my computer.
Another one...

And another! This one is a bit different and lives on the coffee table.

For those of you looking to beef up your holiday décor for next year, you could fill this hurricane with some shiny and colorful ornaments, or some sprigs of evergreen and red berries. They look great on a mantle in a grouping of three, a bedside table, or if you’re like us college kids, you can add a little beauty to the place you end up spending more time than you’d like: your desk. 

Be sure to check this easy, wallet-friendly project out! If you’ve created something similar, comment with a link to your finished product! 

Have a happy and decorative new year,